
mat cutting:
http://forum.thegiant.org/viewtopic.php ... ve&start=0
building a simple frame:
supplies/suppliers:
http://www.bagsunlimited.com/cart/browse.asp?cat=194 <great place for oddball supplies like mylar strips, corners, japanese hinge paper etc... also good prices on mylar sleeves and acid free boards for your larger prints
- One quick trip to Michaels to get a quote for a framing job was all it took..
a month later I had bought a mat cutter, and was off to the races....
I have gone from cutting simple mats to building my own frames (odd size work)... will gladly answer questions you might have although I do not consider myself a professional... just a collector who has done some research, and I prefer myself handling my art versus the employee at a chain store who makes $10 an hour... (just my warped thinking...) plus, it is much cheaper...
Will ad to the thread as I go... please feel free to ask questions and or add input... (will work on the thread a little bit every other day or so)
peace... ec
DIY framing with easycraig
-
extremeimages77

- Giant
- Posts: 2986
- Joined: Mon Oct 08, 2007 2:33 pm
- Location: Boston MA
American Frame with do it... although I have never used them:
http://www.americanframe.com/catalog/ma ... board.html
http://www.americanframe.com/catalog/ma ... board.html

For us aroudn the LA area, myabe you can help out a little more!
Where do you get your mats at? Aaron Bros?
How do you use these Mylar corners to hold the print in the Mat?
How do you float a print?
Is there anything else that I should do to make it easier for me to frame?
What do we need to make our own frames as well!!!
Thanks
Where do you get your mats at? Aaron Bros?
How do you use these Mylar corners to hold the print in the Mat?
How do you float a print?
Is there anything else that I should do to make it easier for me to frame?
What do we need to make our own frames as well!!!
Thanks
easycraig wrote:I'm in.... whats another $900 when you owe THOUSANDS!!!!!

I'm not sure about EC but I get my mats from Michaels/Aaron Bros. (same company you know) for less than $14 for the whole matboard which is like 30"x40" or something like that. Enough to mat two OG prints and many smaller prints.
sorry for the hijack EC. I will now let the master speak...
sorry for the hijack EC. I will now let the master speak...
Wanted: Obey prints on Postal Paper
-this is a "learn as we go" thread so input is always welcomed...
as circa77 said... Aaron Bros/Michaels or any art store should have mat for sale... cost for basic colors is usually in the ballpark of $11-15....
- we have an Aaron Bros near buy... and they almost always have a 40% off coupon running (like they do now) -so I print out a few of them
(here: http://www.aaronbrothers.com/coupon.php ) and when I drive by I walk in and buy 1 piece of mat... either black, red, or white <seems you can never have too much of those colors... - with the coupon it is under $8...
- they only let you use the coupon for 1 item though... so I pick up something every other day!!!!
anyways... here are my basic tools of the trade :

- Lineco see through mounting strips.. mylar framing corners, japanese hinging paper, pro artist tape, and scotch scrapbooking tape-double sided removable acid free.
- I opened up my Amy Sol to show you a close up of the Lineco mounting strips... any print that you cut a mat for, you should be able to use these strips... they are awesome because they hold the print in from the back side and stick to the mat... (nothing sticks to the print) - they can be cut to different sizes and trimmed for narrow mat...
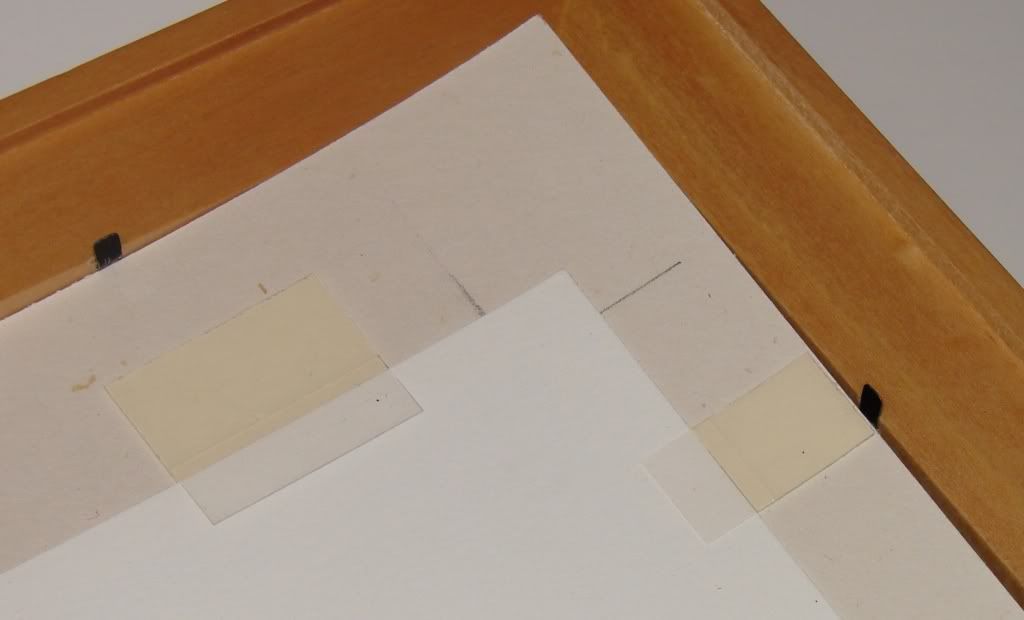
I tend to use the mylar framing corners for print that I want to mount to a piece of mat board or backing board.... only downside is they do show if you look closely.... but my guess is I am the only person who sees them.. ( i see dead people in mylar corners!!)
print from a distance: (you would never see them)

here is a close up of the bottom corner :
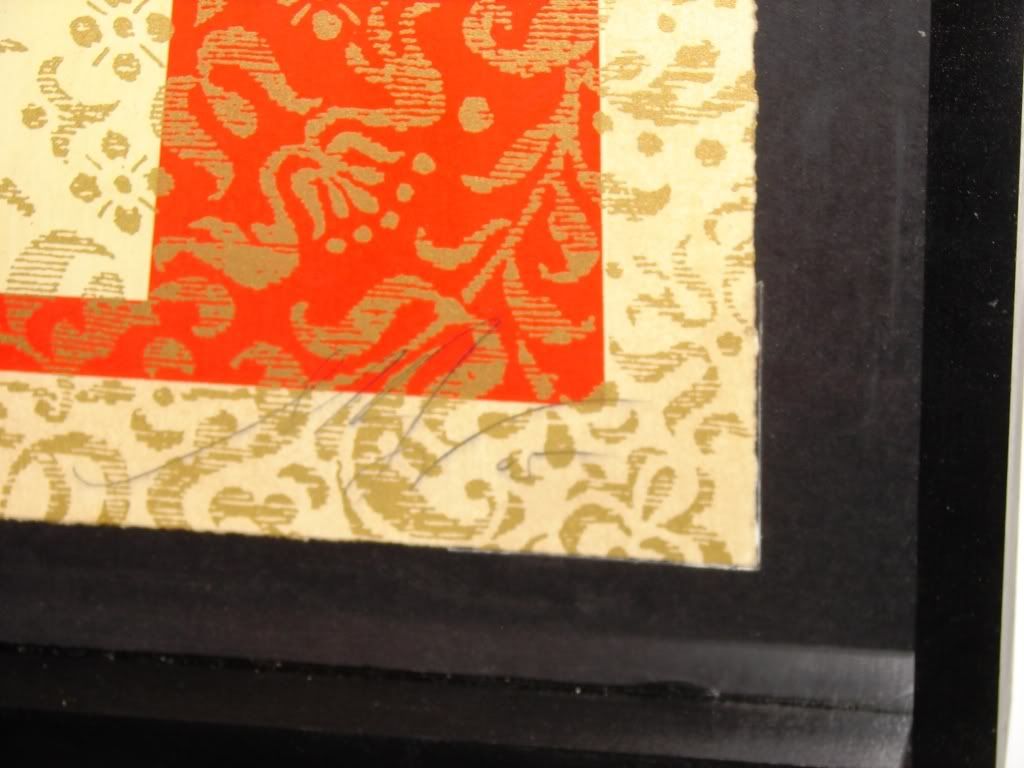
the easiest item to use is the Pro Artist Tape... just stick the print to the mat... I have had no problems removing the tape over a 6 month period.... but I suggest hitting the tape with a warm blow dryer for a minute or so... really helps loosen it up and it peels right off.
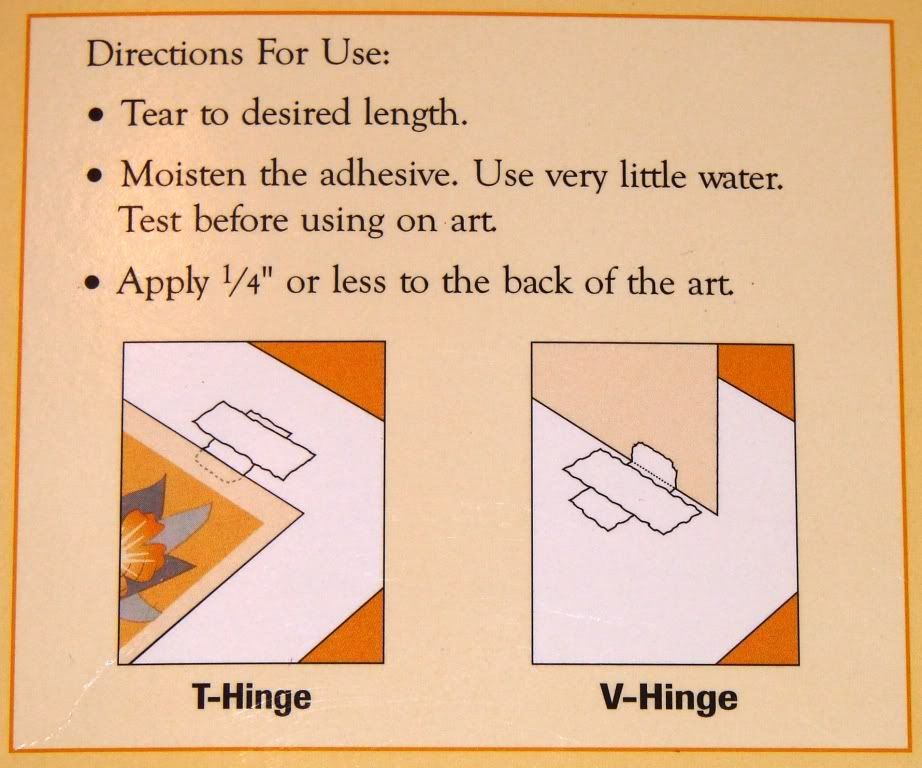
Japanese Hinges... - I just got these in and have yet to use them... they should be helpful with float mounting... but with any float mount... the print must adhere to some form of backing so you run the risk of problems in the future.... (going to test this stuff out here soon, will get back with a report later)
I float mounted my bomber with the Scotch scrapbooking tape... -I
have used this stuff before with no problems, - same as the artist tape, you definately want to hit the print where the tape is with some heat from a blow dryer prior to pulling it off....
here is how I put the bomber together
used a glue gun and glued styrofoam from an art store to a piece of mat smaller then the bomber print itself:
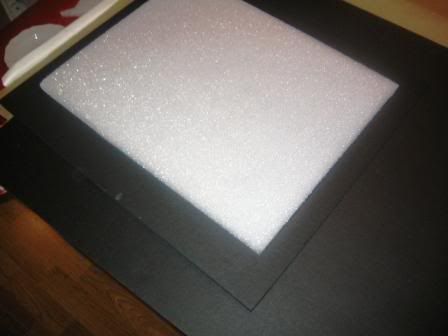
then flipped it back around (styrofoam is now on the under side so you cannot see it) and glued it to the backing board:

then i (GULP) stuck the print to the raised mat - in person, this gives the print a great look... like its a plane floating in the frame:

finished product :

- I build the frames for all of my odd ball size stuff... really easy... -they all are deep frames... about 3 inches... -simple box frames... will take some pictures next time I make one....... best thing is the wood is under $15 and a piece of plexi is $15 -$75 depending on size and quailty...
peace... holler if I can help with anything... EC
as circa77 said... Aaron Bros/Michaels or any art store should have mat for sale... cost for basic colors is usually in the ballpark of $11-15....
- we have an Aaron Bros near buy... and they almost always have a 40% off coupon running (like they do now) -so I print out a few of them
(here: http://www.aaronbrothers.com/coupon.php ) and when I drive by I walk in and buy 1 piece of mat... either black, red, or white <seems you can never have too much of those colors... - with the coupon it is under $8...
- they only let you use the coupon for 1 item though... so I pick up something every other day!!!!
anyways... here are my basic tools of the trade :
- Lineco see through mounting strips.. mylar framing corners, japanese hinging paper, pro artist tape, and scotch scrapbooking tape-double sided removable acid free.
- I opened up my Amy Sol to show you a close up of the Lineco mounting strips... any print that you cut a mat for, you should be able to use these strips... they are awesome because they hold the print in from the back side and stick to the mat... (nothing sticks to the print) - they can be cut to different sizes and trimmed for narrow mat...
I tend to use the mylar framing corners for print that I want to mount to a piece of mat board or backing board.... only downside is they do show if you look closely.... but my guess is I am the only person who sees them.. ( i see dead people in mylar corners!!)
print from a distance: (you would never see them)
here is a close up of the bottom corner :
the easiest item to use is the Pro Artist Tape... just stick the print to the mat... I have had no problems removing the tape over a 6 month period.... but I suggest hitting the tape with a warm blow dryer for a minute or so... really helps loosen it up and it peels right off.
Japanese Hinges... - I just got these in and have yet to use them... they should be helpful with float mounting... but with any float mount... the print must adhere to some form of backing so you run the risk of problems in the future.... (going to test this stuff out here soon, will get back with a report later)
I float mounted my bomber with the Scotch scrapbooking tape... -I
have used this stuff before with no problems, - same as the artist tape, you definately want to hit the print where the tape is with some heat from a blow dryer prior to pulling it off....
here is how I put the bomber together
used a glue gun and glued styrofoam from an art store to a piece of mat smaller then the bomber print itself:
then flipped it back around (styrofoam is now on the under side so you cannot see it) and glued it to the backing board:
then i (GULP) stuck the print to the raised mat - in person, this gives the print a great look... like its a plane floating in the frame:
finished product :
- I build the frames for all of my odd ball size stuff... really easy... -they all are deep frames... about 3 inches... -simple box frames... will take some pictures next time I make one....... best thing is the wood is under $15 and a piece of plexi is $15 -$75 depending on size and quailty...
peace... holler if I can help with anything... EC
-
TheOmethod

- Ministry of Information
- Posts: 1694
- Joined: Fri Aug 18, 2006 11:45 pm
- Location: Southern California
-
cybernigel

- Giant
- Posts: 7266
- Joined: Tue Apr 03, 2007 10:01 am
- Location: Denver
-
rhombus_77

- Giant
- Posts: 1881
- Joined: Wed Aug 15, 2007 1:00 am
- Location: Tucson, AZ
EC> this post is much appreciated. I never would have thought about "mounting" the print to the mat via Lineco strips. I would have used mylar triangles and tried to have hidden them with the mat.
My question is about floating a print. I have seen diagrams showing how to v-hinge (I think that is what it is called). How exactly do you do this and have a squared print? Do you place four v-hinges on the print and try to place it squarely on the archival backer?
Many thanks
My question is about floating a print. I have seen diagrams showing how to v-hinge (I think that is what it is called). How exactly do you do this and have a squared print? Do you place four v-hinges on the print and try to place it squarely on the archival backer?
Many thanks
-rombuss 77 - I agree, the strips are much easier to work with versus the corners.... also, with the corners.. there needs to be enough mat covering the print for them not to show.... ( plus, they are a bit of a pain the ars to put on... sticker then hell too I might add )
Here is a close up of the Japanese Hinge paper.... I am hesitant to use because of the centering issues.... my guess is you just hinge the top portion of the art to the backing... ( v-hinge so it does not show )... you cannot hinge the bottom portion because you would then be unable to get the water to the paper if you wanted to remove it.... if you look at pieces that are floating... the print usually is wavy because it literally is just hanging there... (hinged from the top only I assume) but as you said... how the hell are you going to get this on straight the first time...??? I will give one of my TBUPS (touched by UPS) prints a try ... maybe later today and report back.....
Here is a close up of the Japanese Hinge paper.... I am hesitant to use because of the centering issues.... my guess is you just hinge the top portion of the art to the backing... ( v-hinge so it does not show )... you cannot hinge the bottom portion because you would then be unable to get the water to the paper if you wanted to remove it.... if you look at pieces that are floating... the print usually is wavy because it literally is just hanging there... (hinged from the top only I assume) but as you said... how the hell are you going to get this on straight the first time...??? I will give one of my TBUPS (touched by UPS) prints a try ... maybe later today and report back.....
Lineco See-through mounting strips. Where do you buy those? Michaels and Aaron bros said that they use them in the back for framing but they do not carry them on the floor.
Wanted: Obey prints on Postal Paper

This is a great thread!
Thanks for all the tips.
I plan on taking all my framed 18x24 prints and upgrading them to 24x30 with mats soon.
All of this info will come in handy.
Thanks for all the tips.
I plan on taking all my framed 18x24 prints and upgrading them to 24x30 with mats soon.
All of this info will come in handy.
Last edited by PDC on Sat Dec 08, 2007 1:24 am, edited 1 time in total.
-
rhombus_77
- Giant
- Posts: 1881
- Joined: Wed Aug 15, 2007 1:00 am
- Location: Tucson, AZ
circa77 wrote:Lineco See-through mounting strips. Where do you buy those? Michaels and Aaron bros said that they use them in the back for framing but they do not carry them on the floor.
You can order the strips at bags unlimited... they come in 4 inch and 12 inch lengths.... I buy the 12, and then cut them to the size I need... I am sure both will work fine...
here is the direct link:
http://www.bagsunlimited.com/cart/detai ... id=ams4020
easycraig wrote:circa77 wrote:Lineco See-through mounting strips. Where do you buy those? Michaels and Aaron bros said that they use them in the back for framing but they do not carry them on the floor.
You can order the strips at bags unlimited... they come in 4 inch and 12 inch lengths.... I buy the 12, and then cut them to the size I need... I am sure both will work fine...
here is the direct link:
http://www.bagsunlimited.com/cart/detai ... id=ams4020
I went to D!ckBlick Art store here in West LA today and they carry the 4 Inch, didn't see the 12 Inch ones.
EC -
What size Framers Corners do you use?
easycraig wrote:I'm in.... whats another $900 when you owe THOUSANDS!!!!!
easycraig wrote:I bought the largest mylar corners they have (1 inch I think... ) ... but would use the strips and by pass on the corners if you can...
I was readin on them and it seems that the strips are MUCH MUCH easier to use, I didn't bother getting the corners.
easycraig wrote:I'm in.... whats another $900 when you owe THOUSANDS!!!!!
-
rhombus_77
- Giant
- Posts: 1881
- Joined: Wed Aug 15, 2007 1:00 am
- Location: Tucson, AZ
Did a little googling for building a wooden frame at home. Wouldn't you know, Bob Vila touched upon it: http://www.bobvila.com/HowTo_Library/Build_a_Picture_Frame-Wall_Hangings-A1528.html
substitute a mitre box for the table saw and this little number http://www.rockler.com/product.cfm?page=725 and you are all set!
substitute a mitre box for the table saw and this little number http://www.rockler.com/product.cfm?page=725 and you are all set!

Hey EC,
I've got a Logan Mat Cutter as well. and was wondering how often you should change the blades. It seems that there should be a specified amount of cuts that are made before replacing the blade. I think I always take it too far and wind up destroying a mat, and then relize that I should have changed it much sooner. While writing this, I became aware that the answers might be in the directions that I tossed out years ago.
Thanks John
toyroom wrote:Hey EC,
I've got a Logan Mat Cutter as well. and was wondering how often you should change the blades. It seems that there should be a specified amount of cuts that are made before replacing the blade. I think I always take it too far and wind up destroying a mat, and then relize that I should have changed it much sooner. While writing this, I became aware that the answers might be in the directions that I tossed out years ago.
Thanks John
thats actually really good question John... I dug up my directions and it says:
NOTE ON BLADE LIFE: No two blades my last the same. It is a good idea to install a new blade before starting a new project to insure best cutting results.
- I guess its 1 or 2 projects per blade... 2 projects if its a single mat and 1 if you are cutting 2 mats would be my guess..... otherwise, that 4th corner cut starts to have a problem (breaking it away from the mat)
TBlaze wrote:Just for some good info, The same size mats as Aaronbros has for $11, Blicks Art supply had them for $6 thats the 32 x 40. And from the ones I've seen way more colors too!!!
-I agree... but when I decide to mat something... I usually want to get on it... and Aaron Bros does have a 40% off coupon ( brings the mat down to $6.60... ) - just download from their website... no Blicks near me but aaron is a few miles away... will be heading over again tonight.... EC
what ever works though!!!

-
rhombus_77
- Giant
- Posts: 1881
- Joined: Wed Aug 15, 2007 1:00 am
- Location: Tucson, AZ
TBlaze wrote:Just for some good info, The same size mats as Aaronbros has for $11, Blicks Art supply had them for $6 thats the 32 x 40. And from the ones I've seen way more colors too!!!
TBlaze> the $6 Blick mats aren't the archival variety. The 32 X 40 archival boards seem to be about $13. Are the Aaron Bros' archival? Thanks
Also, has anyone had any luck using this tool:
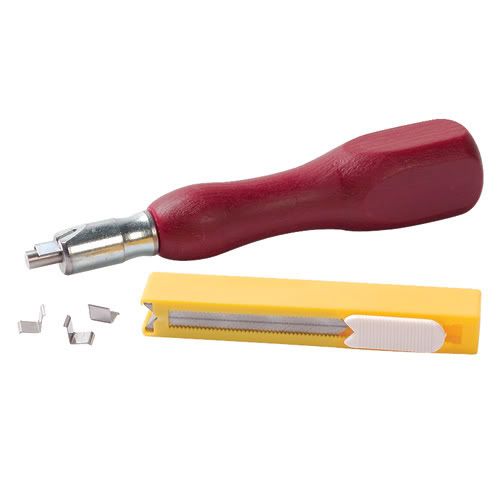
It is fairly cheap at $30. All the other v-nail joiners seem pretty heavy duty and expensive.
-
rhombus_77
- Giant
- Posts: 1881
- Joined: Wed Aug 15, 2007 1:00 am
- Location: Tucson, AZ
Ideabolo's framed Hope print got me thinking about how to frame my copy.
Ideabolo's:

I like the idea of matching the red on the print with the matting. I have been messing around with making my own frames from oak molding. This is a mock up of what I am aiming for:


While the mockup frame doesn't have it, I am thinking of applying a gold undercoat first and then the "rubbed off" black coat. My concern is that the frame might be too rustic. Also, the technique I used on the mockup makes the black look like crayon. Varnish it? Any thoughts or suggestions would be awesome.
Ideabolo's:
I like the idea of matching the red on the print with the matting. I have been messing around with making my own frames from oak molding. This is a mock up of what I am aiming for:
While the mockup frame doesn't have it, I am thinking of applying a gold undercoat first and then the "rubbed off" black coat. My concern is that the frame might be too rustic. Also, the technique I used on the mockup makes the black look like crayon. Varnish it? Any thoughts or suggestions would be awesome.